We love turning
data into successful
business stories
Marketing und Vertrieb, stronger together – das ist unsere Mission! Wir bündeln Kommunikation, Lead Management und Marketing Daten in unseren Lösungen, für mehr Erfolg im Vertrieb und Marketing.
Powered by:
Call Tracking- und Communication based Lead Management-Software vom Marktführer matelso.


We love turning
data into successful
business stories
Marketing und Vertrieb, stronger together – das ist unsere Mission! Wir bündeln Kommunikation, Lead Management und Marketing Daten in unseren Lösungen, für mehr Erfolg im Vertreib und Marketing.

Powered by:
Call Tracking- und Communication based Lead Management-Software vom Marktführer matelso.


10k+ Websites nutzen unser Call Tracking
“...mit matelso Call Tracking stellen wir eine optimale Onlinemarketing-Performance für alle Geschäftsmodelle sicher …”
“Ideal zum Messen von Anrufen. Gute Funktionalität und Bedienbarkeit, toller Support, relativ einzigartige Features …”
“Must Have für jeden Marketeer, der mit Call-Leads arbeitet! … mittlerweile eine der wichtigsten Entscheidungshilfen überhaupt. …”
“...Die Implementierung sowie die Zusammenarbeit mit matelso ist unkompliziert und stets lösungsorientiert. …”
“...durch die Optimierungen mit Call Tracking haben wir 8% mehr Leads für die Franchisenehmer generiert …”
matelso platform

matelso platform: marktführende Communication & Lead Management-Plattform
Unsere Mission: Wir schweißen Marketing und Vertrieb in einem nahtlosen Lead Management-Prozess zusammen und machen so beide gemeinsam zum Treiber des Geschäftserfolgs!
Massiv verkürzte Toolchain
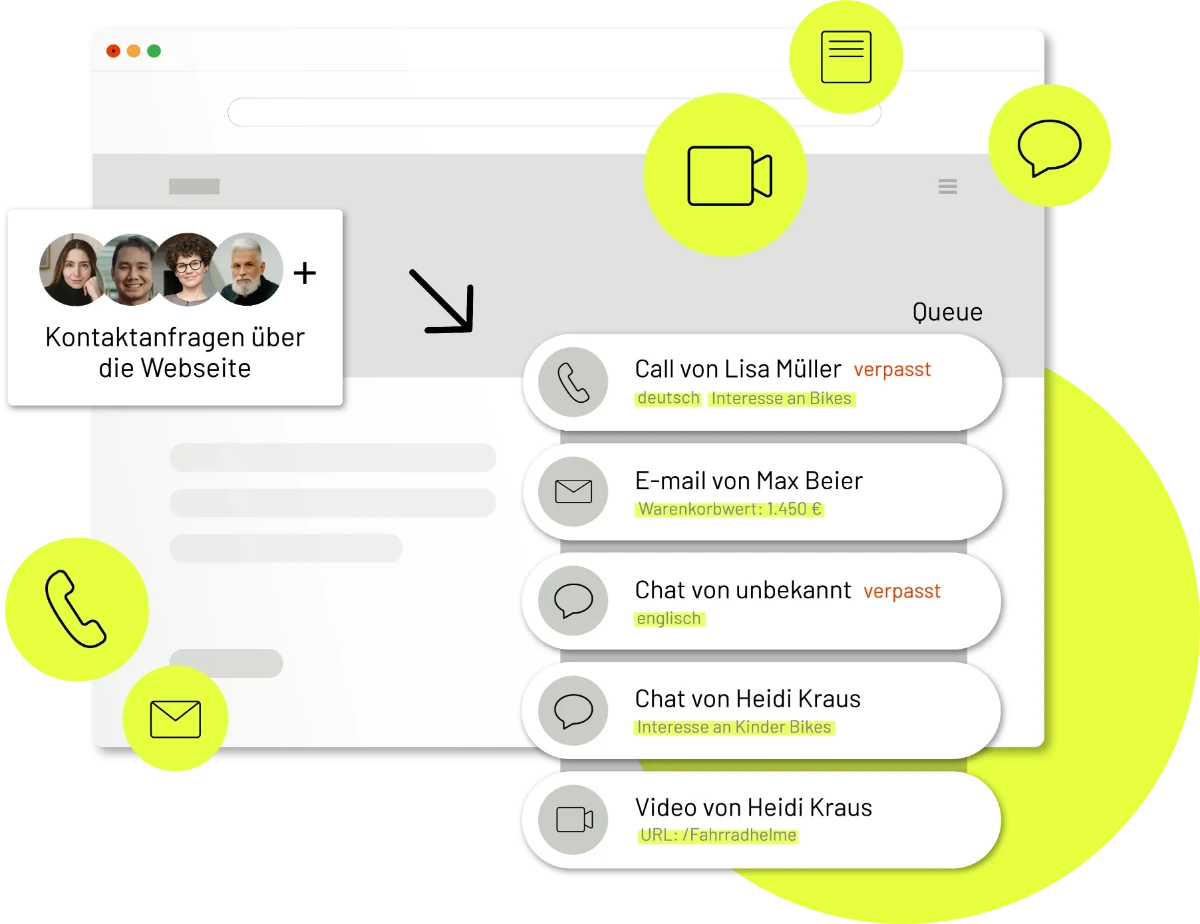
Kommunikationsplattform mit Mail, Chat, Video-, Call und Kontaktformular, die alle Konversationen zusammenführt
Transparenter Marketing ROI und bessere Ergebnisse
Marketing- und Lead-Daten schnell und einfach in das CRM oder die Analytics-Tools wie Google Analytics 4 (GA4) übertragen
Bessere Customer Experience
Potenzielle Kunden direkt in der matelso platform beraten und diese Leads im Sinne des Lead Managements bewerten (scoren)

matelso Call Tracking
matelso Call Tracking: Optimierter Marketing-ROI und stärkere Insights für das Marketing.
Call Tracking ist für das Onlinemarketing in vielen Branchen – B2B, Automobilhandel, (Performance Marketing-) Agenturen – schlicht ein MUSS!
Sauberes Reporting: bessere Entscheidungen treffen
Anrufe mit Marketing Aktivitäten wie SEA, Social, Print verbinden. Echte lokale Tracking Rufnummern für online und offline Call Tracking
Maximaler Marketing-ROI
Call Conversions zur Optimierung in Smart Bidding Kampagnen nutzen
Erfolgreiches Lead Management
Anruf Daten in Dashboard-, Webtracking-, Marketing- und CRM-Lösungen integrieren
matelso Integrationen
matelso Marketing und Sales Daten in Drittsysteme wie CRM und Webanalyse integrieren.
Wir bieten Ihnen mit unseren innovativen MarTech-Lösungen eine einfache Integration Ihrer Daten in Dritt-Systeme wie CRM, Analyse-Tools oder ERP. Sie ermöglichen Echtzeit-Updates Ihrer Marketingaktivitäten ohne Daten-Silos.

connected ![]()

connected ![]()

connected ![]()

connected ![]()

connected ![]()

connected ![]()
Kontaktieren Sie uns:
matelso in the press
Unsere Technologie und unsere Marken finden in der Öffentlichkeit immer mehr Beachtung. Dies macht sich nicht zuletzt durch zunehmende Presseberichterstattung bemerkbar. Hier können Sie erleben, wie die Medien über uns und unsere Martech-Lösungen berichten – Call Tracking und die matelso platform. Mehr zu unserer Pressearbeit finden Sie in unserem Newsroom.

So sollten sich Unternehmen auf den EU AI Act vorbereiten
HORIZONT | 07.07.2023
Vermutlich am 1. Januar 2026 wird der EU AI Act in Kraft treten. Alle Unternehmen, die Künstliche Intelligenz einsetzen, sind davon betroffen und sollten bereits jetzt Vorbereitungen treffen. Denn am Regelwerk wird sich nicht mehr viel ändern.

matelso stellt Marketing Communication neu auf
absatzwirtschaft | 30.06.2023
Das Marketing-Tech-Unternehmen matelso stellt sich strategisch neu auf: Gründer und CEO Frank G. Froux beruft ein neues Marketing Communication-Team. Iwen Kuhn, William Wells, Laura Schmitt und Danny Andris teilen sich die Aufgabe.

Kundengespräche optimieren: 3 KI Anwendungsfälle
marconomy | 29.05.2023
Kundengespräche sind insbesondere im B2B Sektor wichtige Kontaktpunkte im Lead Management Prozess. Hier entscheidet sich oft, ob ein Deal zustande kommt oder nicht. Künstliche Intelligenz kann Unternehmen dabei helfen, erfolgreicher zu sein.
Sie wollen Marketing & Sales stärker verdrahten?
Die Lösung: Call Tracking und Lead Management von matelso!
Überzeugen Sie sich selbst davon, wie die Software-Lösungen matelso Call Tracking und matelso platform Ihre gebündelte Marketing- und Vertriebs-Power maximieren können.
matelso Blog
Auf unserem Blog teilen wir Wissen und Insights mit unseren Lesern – immer nutzwertig, immer interessant. Dort finden Sie auch unsere Webinare und die Success Stories unserer Kunden.
Hier finden Sie eine Auswahl unserer aktuellsten Artikel, mit diesem Link können Sie aber auch direkt auf den Blog zugreifen: Blog
B2B-Lead-Gen-Kampagnen: 5 Praxis-Tipps für mehr Erfolg
Gastartikel von Ercan Kantar, Gründer & CEO von Supersol IT SolutionsDie Bedeutung von Lead-Gen-Kampagnen in B2BIn der B2B-Welt ist es besonders wichtig, kontinuierlich neue qualifizierte Leads zu generieren. Sie sind der Treibstoff einer erfolgreichen...
matelso On-Stage: Unser Konferenz-Programm 2024
MarTech von matelsoWarum ein Konferenz-Programm? Über die vergangenen 15 Jahre waren wir mit unserem MarTech-Unternehmen als Spezialist zu den Themen Call Tracking und Onlinemarketing-Optimierung im Markt unterwegs. In dieser Zeit haben wir mit unseren Lösungen und...
Drei neue Kollegen für Sales und Customer Care
Unsere Entwicklung als MarTech-Unternehmen schreitet stets voran. Nicht nur unsere Software-as-a-Service-Lösungen für Call Tracking und Multichannel Communication & Lead Management werden kontinuierlich besser. Vielmehr schaffen wir neue Strukturen und...
matelso FAQ
Wie immer gilt, wenn es um Technologie geht: Es gibt viele Fragen, die beantwortet werden sollten! In unseren FAQs gehen wir die wichtigsten an, die wir in Gesprächen mit Kunden und Prospekts Tag für Tag gestellt bekommen.
Was steckt hinter matelso?
Wir sind einer der führenden Anbieter von MarTech-Lösungen und -Plattformen rund um die Themen Communication Management, Lead Management, Call Tracking sowie Online- und Digitalmarketing.
Seit über 15 Jahren setzt unser rund 40-köpfiges in Kaiserslautern ansässiges Team innovative Business-Akzente und unterstützt Kunden die Portale Autoscout24 und Immoscout24, die Agentur moccamedia, der Elektronikhändler Euronics, der Automobilhersteller Nissan sowie Telekommunikationsunternehmen wie Vodafone oder Telefonica dabei, ihre Marketing-Kampagnen und -Spendings zu optimieren.
Was macht matelso genau?
Wir kreieren effizientere und bessere Sales-, Customer Care-, Entscheidungs- sowie Lead Management-Prozesse.
Wir sorgen für mehr Effizienz
Mit einer cloud-basierten, schlüsselfertigen Technologie unterstützen wir unsere Kunden dabei, effizientere und bessere Prozesse aufzusetzen. In den Bereichen Sales, Customer Care sowie bei Unternehmensentscheidungen und im Lead Management.
Wir verbinden
Unsere Software-as-Service-Lösungen stellen vom ersten Klick auf der Website bis zum bewerteten Lead im CRM alle relevanten Daten unternehmensweit, nahtlos und an einem zentralen Ort zur Verfügung.
Wir vereinfachen und verbessern
Mit innovativen Plattformen vereinfachen wir die Toolchain massiv, verbessern die Daten-Qualität im CRM signifikant und eliminieren aktiv Daten-Silos innerhalb eines Unternehmens.
Wie viele Kunden hat matelso aktuell?
Wir haben über 500 Kunden, die unsere MarTech-Lösungen in den Bereichen Call Tracking und Communication based Lead Management aktiv einsetzen. Unsere Call Tracking-Technologie ist derzeit auf über 10.000 Webseiten verbaut und sorgt für echten Geschäftserfolg und einen massiv verbesserten Marketing-ROI unserer Kunden.
Was ist das Unternehmensziel von matelso?
Unsere Mission lautet: We love turning data into successful business stories!
Wir glauben an die positive Macht der Daten. Sie schafft Wissen über Menschen und bildet damit die Basis für den Erfolg für unserer Kunden. Unsere Mission begleitet uns jeden Tag. Seit unserer Gründung 2006. Sie ist die Grundlage für alle unsere MarTech-Lösungen und -Plattformen.
Unser Ziel: Wir unterstützen Unternehmen dabei, effizientere und bessere Prozesse aufzusetzen. In allen relevanten Bereichen: Im Marketing, Sales und im Customer Care, bei Unternehmensentscheidungen sowie im Lead Management.
Was bedeutet der Standort Kaiserslautern für matelso?
Für uns als Unternehmen hat der Innovationsstandort Kaiserslautern eine ganz besondere Bedeutung. Ein Großteil unserer Kollegen kommt aus der Region – einschließlich unseres CEO Frank G. Froux. Zudem finden wir hier hervorragende Bedingungen für weiteres Wachstum:
- Nähe zu Universitäten und Hochschulen
- Kontakt zu vielen IT- und Tech-Unternehmen
- Ein kontinuierlicher Strom an neuen Ideen und Inspirationen für unsere MarTech-Lösungen
Wir fühlen uns dem Wirtschaftsstandort Kaiserslautern so verpflichtet, dass wir ein zukunftsträchtiges Statement setzen: Wir bauen für matelso ein komplett neues Firmengebäude auf der Europahöhe – unser Inspiration Hub. Hier werden wir ab September 2023 neue Impulse für Digitalisierung von Unternehmen setzen und uns im Austausch mit Partnern, Kunden und Experten weiter inspirieren lassen. Immer mit unserem Motto im Blick: Turning data into successful business stories!
Was ist der Unterschied zwischen der matelso platform und Call Tracking?
Der Hauptunterschied: Call Tracking ist auf Anruf-Analysen spezialisiert, während das Lead Management-System matelso platform den gesamten Prozess vom ersten Klick auf der Website bis zum bewerteten Lead in Google Analytics 4 (GA4) oder Google Ads abbildet.
Speziell:
- Call Tracking: Verfolgt und analysiert eingehende Anrufe, oft im Rahmen von Marketingkampagnen, um deren Performance zu bewerten.
- matelso platform: Bildet den gesamten Prozess der Kommunikation (per Mail, Chat, Telefonie, Video-Call, Kontaktformular) und des Lead Managements ab und unterstützt dabei die Konvertierung von potenziellen Kunden (Leads) – inklusive Lead Scoring, Lead-Nurturing und Conversion.
Wie werde ich Teil des matelso-Teams?
Wir suchen kontinuierlich neue Kollegen für alle Bereiche unseres Unternehmens. daher unsere ausdrückliche Einladung: Bewirb Dich und komm an Bord!
Unsere aktuellen Stellenausschreibungen findest Du hier: matelso.com/karriere/


